#include <Adafruit_CircuitPlayground.h>
//incio del Programa
void setup() {
Serial.begin(9600);
CircuitPlayground.begin();
}
//ciclo del Programa
void loop() {
if (CircuitPlayground.leftButton()== 1) {
//si se presiona el botón izquierdo
CircuitPlayground.setPixelColor( 0, 255, 0, 0 );
CircuitPlayground.setPixelColor( 1, 0, 0, 0 );
}
if (CircuitPlayground.rightButton()== 1) {
//si se presiona el botón derecho
CircuitPlayground.setPixelColor( 0, 0, 0, 0 );
CircuitPlayground.setPixelColor( 1, 255, 0, 0 );
}
}
RETOS
Reto 1:
Al presionar un botón se encienden todos los neopixeles de la tarjeta, y al presionar el otro se apagan.
Reto 2:
Al presionar un botón se enciende los cinco neopixeles de ese lado de la tarjeta y se apagan los del otro lado, al presionar el otro botón, se apagan los neopixeles del otro lado y se encienden los 5 de lado del botón presionado.
Retro 3:
Al presionar los dos botones juntos, los neopixeles se encienden, al volver a presionar los dos botones juntos se apagan
Esta imagen pertenece al juego de Pokemon, que pasa en esta imagen?
Aquí se escoge el pokemon inicial.
PALABRA CLAVE: ESCOGER
Qué pasa en esta imagen? que podría estar pensado esta persona?
Tal vez piensa que:
si es mas grande la manzana verde que la roja.
si es más barata.
si es más dulce.
si es pesada
si esta buena o mala.
si ....
PALABRA CLAVE: SI
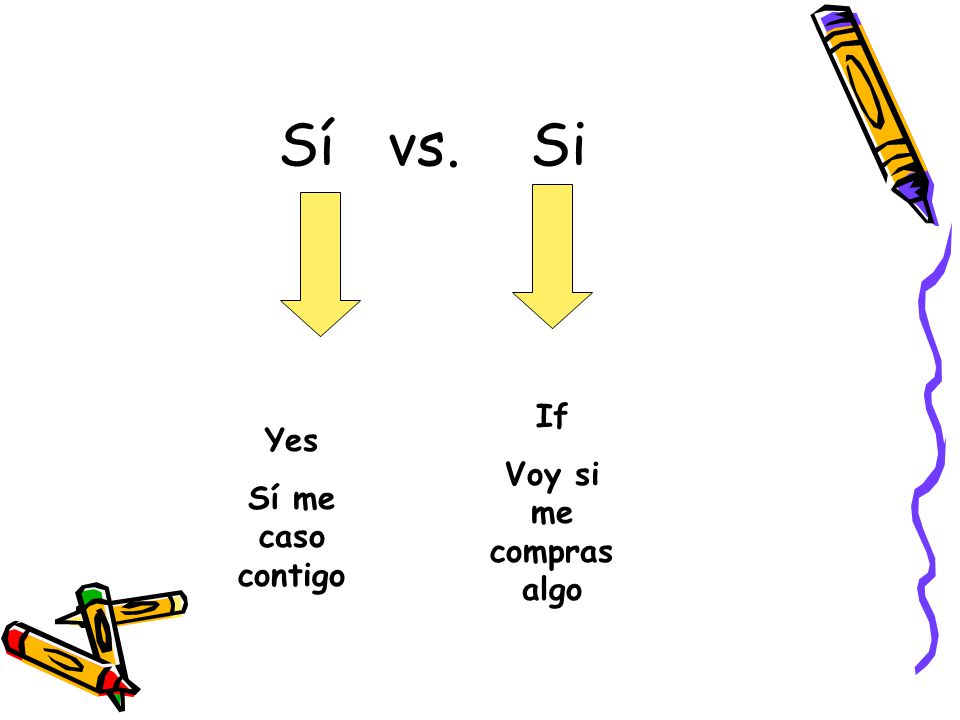
Diferencia entre Sí y Si
SÍ = AFIRMACIÓN
SI = CONDICIÓN
Vamos a trabajar con los botones de nuestra Circuit PlayGround.
Ubicamos los botones izquierdo (left) y el derecho (right)
SI EL BOTÓN ESTA SIN PRESIONAR SU VALOR ES 0
SI EL BOTÓN ESTA PRESIONADO SU VALOR 1
Vamos a escribir un código en el cual, SI se presiona el botón izquierdo (valor = 1), encienda el neopixel 0 y si está suelto o sin presionar (valor = 0) se apaga.
#include <Adafruit_CircuitPlayground.h>
//incio del Programa
void setup() {
Serial.begin(9600);
CircuitPlayground.begin();
}
//ciclo del Programa
void loop() {
CircuitPlayground.setPixelColor( 0, 0, 0, 0 );
//apaga los neopixeles
if (CircuitPlayground.leftButton()== 1) {
//si se preciona el botón izquierdo
CircuitPlayground.setPixelColor( 0, 255, 255, 255 );
//enciende los neopixeles
}
}
Reto 1:
Haga que si se presiona el botón izquierdo se enciendan todos los neopixeles de diferentes colores y si esta sin presionar se apagan.
#include <Adafruit_CircuitPlayground.h>
//incio del Programa
void setup() {
Serial.begin(9600);
CircuitPlayground.begin();
}
haga un semáforo peatonal. todos los neopixeles estan en verde si el botón no es presionado, si el botón se presiona, los neopixeles verdes se encienden y apagan (si es posible dos veces), luego se encienden en color amarillo por 5 segundos, luego cambian a rojo y suena una alarma por 5 segundos.
#include <Adafruit_CircuitPlayground.h>
//incio del Programa
void setup() {
Serial.begin(9600);
CircuitPlayground.begin();
}
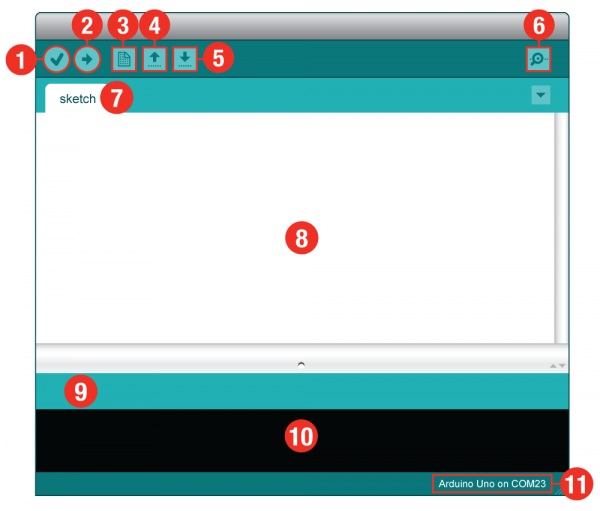
Al conectar la tarjeta por favor verificar lo siguiente:
En el Menú de Herramientas, seleccione "placa"y allí busque la placa "Adafruit Circuit Playground".
Luego en el menú "herramientas" seleccione "Puerto" y allí verá el circuitPlayground, selecciónelo.
Vamos a crear sonidos con nuestra tarjeta CircuitPlayground
Utilizamos este sintaxis:
CircuitPlayground.playTone (262,500); // NOTA DO
Cambiamos los números para otras notas:
DO 262,500
RE 294,500
MI 330,500
FA 349,500
SOL 392,500
LA 440,500
SI 494,500
DO 523,500 más agudo
Escribimos el siguiente código:
// Copie utilizando el codigo camello (respete las mayúsculas en las palabras)
// CUIDADO CON LAS LLAVES y LOS PARENTESIS
#include <Adafruit_CircuitPlayground.h>
void setup() { //incio del Programa
Serial.begin(9600);
CircuitPlayground.begin();
}
void loop() {//ciclo del Programa
//sonidos
CircuitPlayground.playTone (262,500); delay(50); // DO
CircuitPlayground.playTone (294,500); delay(50); // RE
CircuitPlayground.playTone (330,500); delay(50); // MI
CircuitPlayground.playTone (349,500); delay(50); // FA
CircuitPlayground.playTone (392,500); delay(50); // SOL
CircuitPlayground.playTone (440,500); delay(50); // LA
CircuitPlayground.playTone (494,500); delay(50); // SI
CircuitPlayground.playTone (523,500); delay(50); // DO2
}
Copiando y pegando algunas lineas de código podemos crear melodías sencillas. Puedes tocar alguna de estas melodías:
Do Fa La Fa Fa Do Fa Fa La Sol La Sib La Sol Fa Mi Mi Do Do Re Mi Mi Fa = - = - = - = - = - = - = - = - = - =
Título: Noche de paz
Sol La Sol Mi Sol La Sol Mi re re Si do do Sol = - = - = - = - = - = - = - = - = - =
Título: La cucaracha
Do Do Do Fa La Do Do Do Fa La
Fa Fa Mi Mi Re Re Do
= - = - = - = - = - = - = - = - = - =
PROGRAMANDO ESTRELLITA DÓNDE ESTAS
// Copie utilizando el codigo camello (respete las mayusculas en las palabras)
// CUIDADO CON LAS LLAVES y LOS PARENTESIS
#include <Adafruit_CircuitPlayground.h>
void setup() { //incio del Programa
Serial.begin(9600);
CircuitPlayground.begin();
}
void loop() {//ciclo del Programa
//sonidos
CircuitPlayground.playTone (262,500); delay(50); // DO
CircuitPlayground.playTone (262,500); delay(50); // DO
CircuitPlayground.playTone (392,500); delay(50); // SOL
CircuitPlayground.playTone (392,500); delay(50); // SOL
CircuitPlayground.playTone (440,500); delay(50); // LA
CircuitPlayground.playTone (440,500); delay(50); // LA
CircuitPlayground.playTone (392,500); delay(50); // SOL
delay (1000);
CircuitPlayground.playTone (349,500); delay(50); // FA
CircuitPlayground.playTone (349,500); delay(50); // FA
CircuitPlayground.playTone (330,500); delay(50); // MI
CircuitPlayground.playTone (330,500); delay(50); // MI
CircuitPlayground.playTone (294,500); delay(50); // RE
CircuitPlayground.playTone (294,500); delay(50); // RE
CircuitPlayground.playTone (262,500); delay(50); // DO
delay (1000);
}
Utilizando este código, ¿puedes simular algunas banderas de algunos países?
// Copie utilizando el codigo camello (respete las mayusculas en las palabras)
// CUIDADO CON LAS LLAVES y LOS PARENTESIS
#include <Adafruit_CircuitPlayground.h>
//incio del Programa
void setup() {
Serial.begin(9600);
CircuitPlayground.begin();
}
Algunos colores que puedes utilizar son los siguientes:
Por ejemplo, la bandera de Costa Rica, podríamos simularla de la siguiente forma:
Y el código de la siguiente forma:
// Copie utilizando el codigo camello (respete las mayusculas en las palabras)
// CUIDADO CON LAS LLAVES y LOS PARENTESIS
#include <Adafruit_CircuitPlayground.h>
//incio del Programa
void setup() {
Serial.begin(9600);
CircuitPlayground.begin();
}
¿Qué es CircuitPlayground?
Es una tarjeta que sirva para introducir a los estudiantes en el mundo de la computación física. Es de fácil uso, ya que trae incorporada actuadores y sensores. Se programa con el mismo software del ARDUINO.
¿Qué son los neopixeles?
Son diodos LED, los cuales se programan para que se enciendan de diferentes colores usando la combinación RGB (RGB = RED GREEN BLUE)
Una forma de programar un neopixel es por medio de este comando.
1 1. Abra el programa Arduino 2.Una vez conectado en el puerto USBde la computadora, conectar el terminal USB micro al terminal del Circuit Playground 3.En el Menú de Herramientas, seleccione "placa"y allí busque la placa "Adafruit Circuit Playground". 4.Luego en el menú "herramientas" seleccione "Puerto" y allí verá el circuit Playground, selecciónelo. 5.En el Menú ARCHIVO, seleccione NUEVO y digitar el código. 6.Guardar con un nombre el programa, antes de subir a la tarjeta.
NOTA: Para guardar, En el Menú ARCHIVO, seleccione Guardar como….
Vamos a programarlo en software de ARDUINO.
// Estas lineas significan comentarios son opcionales, pero es mejor copiarlos
// Copie utilizando el codigo camello (respete las mayusculas en las palabras)
// CUIDADO CON LAS LLAVES y LOS PARENTESIS
#include <Adafruit_CircuitPlayground.h>
//incio del Programa
void setup() {
Serial.begin(9600);
CircuitPlayground.begin();
}
//ciclo del Programa
void loop() {
//enciende en blanco el neopixel 1
CircuitPlayground.setPixelColor( 1, 255, 255, 255 );
delay (1000); //espera un segundo
//apaga el neopixel
CircuitPlayground.setPixelColor( 1, 0, 0, 0 );
delay (1000); //espera un segundo
}
Reto 2: ¿Puedes encender más neopixeles de la circuitPlayGround?
Reto 3: ¿Puedes encender los neopixeles
pares de color rojo y los impares en azul?
En el laboratorio de informática educativa debes de cumplir con las siguientes reglas
·Utilizarlas con las manos limpias. ·No golpee el equipo y utilícelo con moderación ·Abrir las LAPTOP tomando la tapa por el medio. ·Si la computadora está encendida, revisar que este en la sección de
trabajo correcta. ·Escuchar sonidos con volumen bajo, recuerde que hay más personas a su
lado. ·Poner a cargar la batería al faltar al menos 10% de su carga. ·GUARDAR su trabajo. ·Cerrar la sesión de trabajo al salir de la clase. ·Apagar la computador si se le solicita. ·No traer llaves mayas (pen drive o memoria USB o Memory Stick) ·Prohibido ver videos de youtube (sin autorización) ·No se permite escuchar música (solo con autorización) ·Prohibido comer chicles o
cualquier otro tipo de comida.
·Revisar el equipo al
ingresar, avisar si tiene algún problema o daño.
Los permisos para salir del aula, son exclusivamente dados por la maestra.